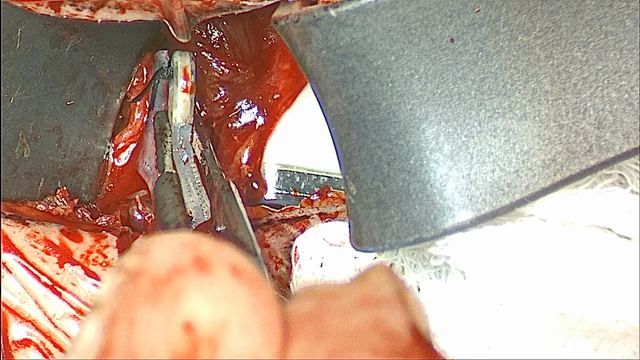
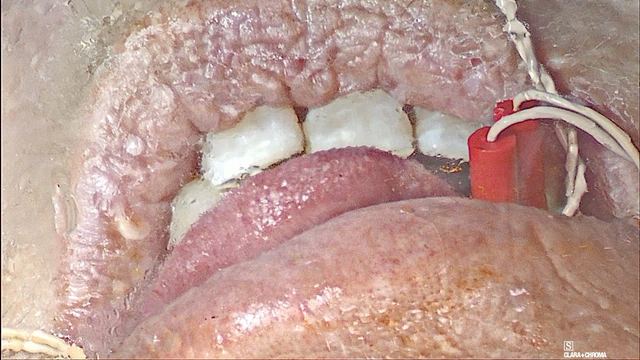
Learn the key steps of implanting the Genio bilateral hypoglossal nerve stimulator. Each step includes key learning points, from the basics to more advanced considerations. Labeled operative photographs from my teaching collection illustrate the technique, and questions help you test your understanding.
Review the key details of the patient’s medical record so you can answer the question: “Why are we doing Genio for this patient?”
Watch the whole operation first. My annotated operative video follows a full Genio implant in about seven minutes, and a second case shows how the anatomy varies from one patient to the next.
Review the sleep study. Review the diagnostic study date, AHI, central and mixed events, oxygenation, and positional pattern. Note whether the study used a 3% or 4% hypopnea definition. Genio is contraindicated when central and mixed events make up 25% or more of the total AHI.
Review prior treatments. Genio is a second-line treatment. The label requires that the patient has been confirmed to fail, cannot tolerate, or is ineligible for current standard-of-care treatment, including lifestyle modifications, PAP, oral appliances, and pharmacotherapy such as tirzepatide. Know what the patient has tried and why it did not work.
The label defines PAP failure as a residual AHI above 15 despite PAP use. PAP intolerance is an inability to use PAP at least 5 nights a week for more than 4 hours a night, or an unwillingness to continue PAP after starting it.
Know the labeled indication. Genio is indicated for moderate to severe OSA, with an AHI of 15 to 65, in adults 22 years of age and older. The indication itself sets no BMI limit, no upper age limit, and no DISE requirement.
Know where the evidence stops. The labeling lists groups in which safety and effectiveness have not been established: age under 22 or over 75, BMI above 32 kg/m², AHI below 15 or above 65, and complete concentric collapse at the soft palate. The pivotal trial excluded palatal complete concentric collapse on DISE, so review the DISE even though the indication does not require one.
The ACCCESS trial is studying Genio in palatal complete concentric collapse. Until it reports, Genio is not established for that pattern.
Compare FDA and payer criteria. Compare the FDA labeling with the patient’s individual payer criteria. Payer policies can differ from the label and from each other, and FDA eligibility does not establish coverage.
Plan for the nightly patch and MRI. The implant has no battery. Each night the patient wears the Activation Chip on a Disposable Patch under the chin, and charges the chip during the day. Confirm that the patient understands and accepts this routine.
Genio is MR Conditional. Scans follow the labeled conditions, no sooner than 8 weeks after implantation or revision, and the chip and patch are never brought into the scan room.
Before moving on: Explain why Genio is appropriate for this patient using the sleep study, prior treatment history, DISE findings, and the patient’s payer criteria.
Genio System 2.1 Surgeon Manual (FDA labeling). Patient-population warnings, MRI conditions, implantation steps, and the intraoperative test criteria. Verified September 22, 2026; consult the current version.
Plan the airway, neuromonitoring, and positioning with anesthesia and the room team, then mark the landmarks and the incision before the prep.
Instruments for the case
Review the instrument set with the scrub team before the case. These are the key tools to have ready for each part of the operation.
Dissection. A standard ENT surgical set, with McCabe and smooth Gerald instruments for the nerve work.
Hemostasis. An energy device for vessel and tissue sealing, and bipolar forceps.
Nerve exposure. Peanuts, gauze, or pledgets to retract the nerve, neuro patties to protect the first side, and Kittners.
Monitoring. The four-channel NIM and its bipolar stimulation probe.
Implant. The Genio Surgical Template, braided non-absorbable 2-0 sutures such as silk, and the Implantable Stimulator.
Testing. The Genio Activation Chip, a Disposable Patch, and a sterile sleeve for testing before and after skin closure.
Work through the steps
Plan the airway. Plan nasotracheal intubation with anesthesia. Keeping the tube out of the oral cavity leaves a clear view of the tongue for nerve mapping and for testing the implant.
Plan short-acting neuromuscular blockade and confirm recovery before nerve mapping.
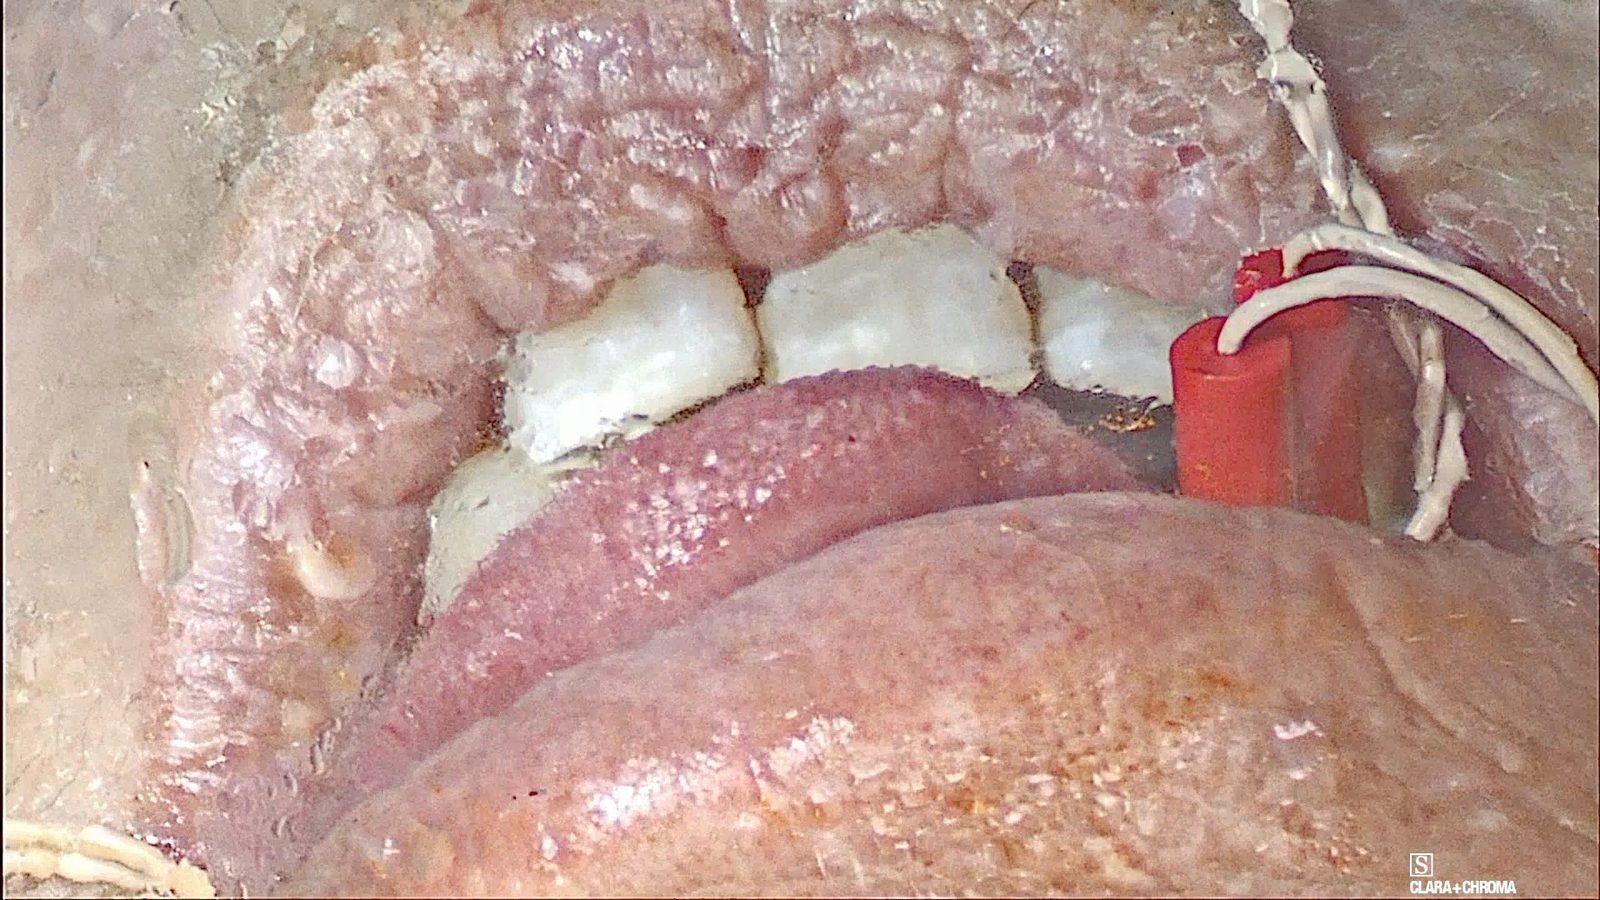
Set up the NIM. Use a four-channel Nerve Integrity Monitor (NIM) with 18 mm recording electrodes. Two channels monitor the genioglossus on each side, in the floor of the mouth, and two monitor the styloglossus/hyoglossus on each side, in the lateral tongue.
Consider securing the recording electrodes with 4-0 silk. Confirm each electrode’s position, channel label, and secure seating before mapping.
Position the patient. Place a shoulder roll for neck extension.
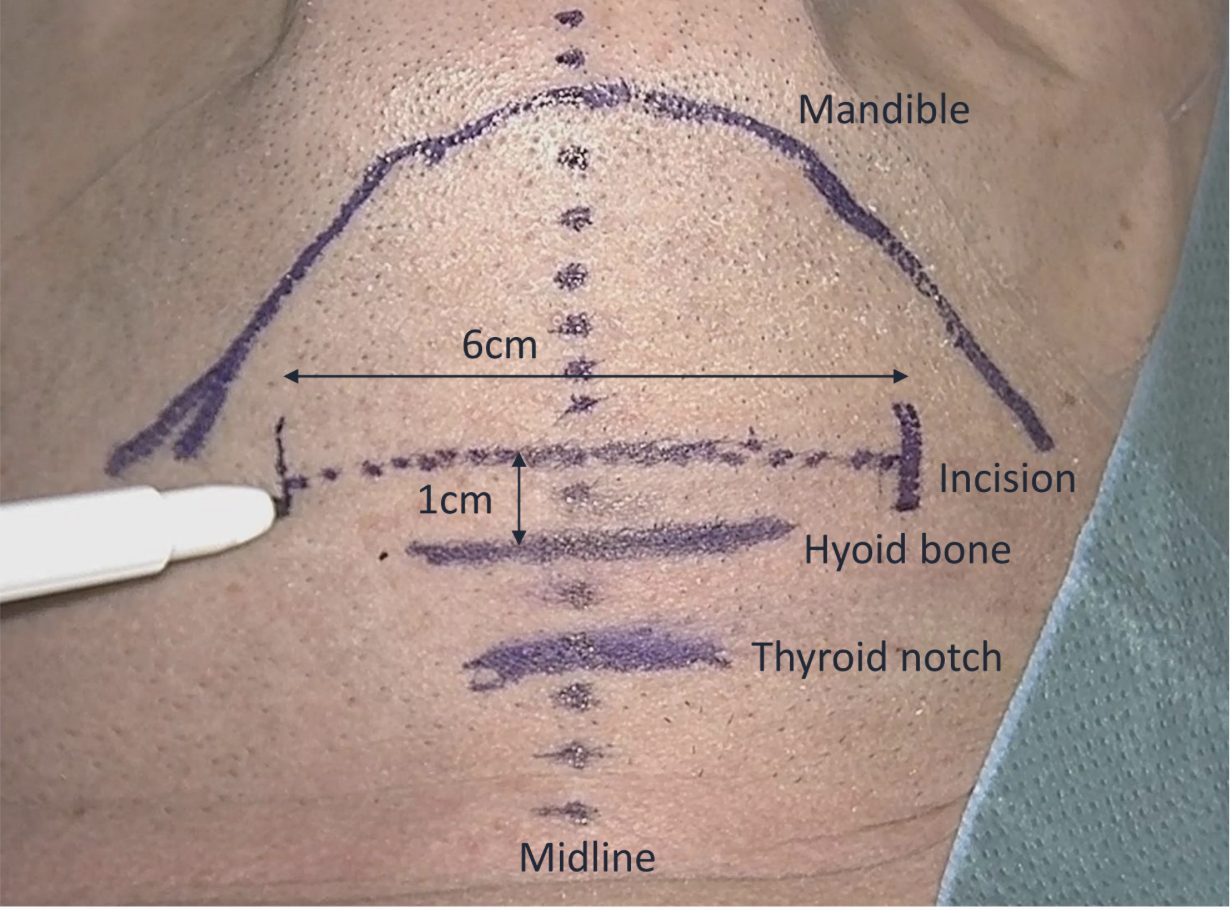
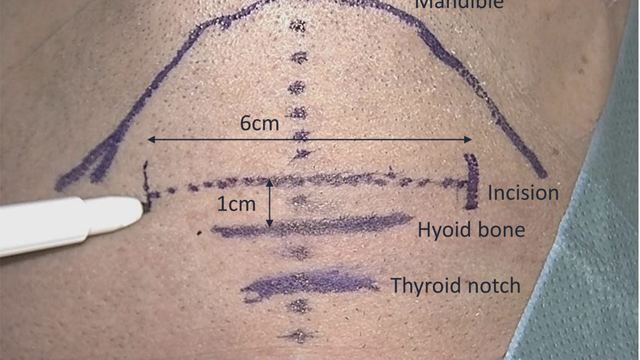
Mark the landmarks and the incision. Mark the inferior border of the mandible, the hyoid bone, the thyroid notch, and the midline from the mandible to the hyoid. Plan a 5–6 cm incision, horizontal or slightly curvilinear, 1 cm above the hyoid.
Surface landmarks and the planned incision
The inferior border of the mandible, the hyoid bone, the thyroid notch, and the midline are marked before the prep. The planned incision runs 1 cm above the hyoid.
Prep and drape. Prepare the skin from the lower lip to the clavicles. Place a clear drape over the oral cavity so tongue movement stays visible, and Ioban over the neck.
Dr. Nord’s teaching
Load Kittners close to the tip of the instrument.
Consider securing the NIM recording electrodes with 4-0 silk.
Keep the tongue in view: a nasotracheal tube and a clear oral drape let the team see protrusion during mapping and testing.
Pitfalls
Covering the mouth with an opaque drape, which hides the tongue response during testing.
Mapping the nerve before neuromuscular blockade has worn off.
Mislabeling NIM channels, which makes left–right and protrusor–retrusor responses hard to interpret.
Before moving on: Confirm the airway plan, the four NIM channels and their labels, and the marked landmarks and incision before the prep.
Genio System 2.1 Surgeon Manual (FDA labeling). Patient-population warnings, MRI conditions, implantation steps, and the intraoperative test criteria. Verified September 22, 2026; consult the current version.
Lesson 03About 10 minGenio
Incision and midline exposure
Open through the platysma, clear the fat over the mylohyoid, divide the mylohyoid in the midline, and split the geniohyoid at its raphe to reach the genioglossus.
Work through the steps
Open through the platysma. Make the incision 1 cm above the hyoid and divide the platysma. Stay in the midline as you dissect down near the platysma.
Raise subplatysmal flaps. Develop subplatysmal flaps from the mandible to the hyoid, then place self-retaining retractors.
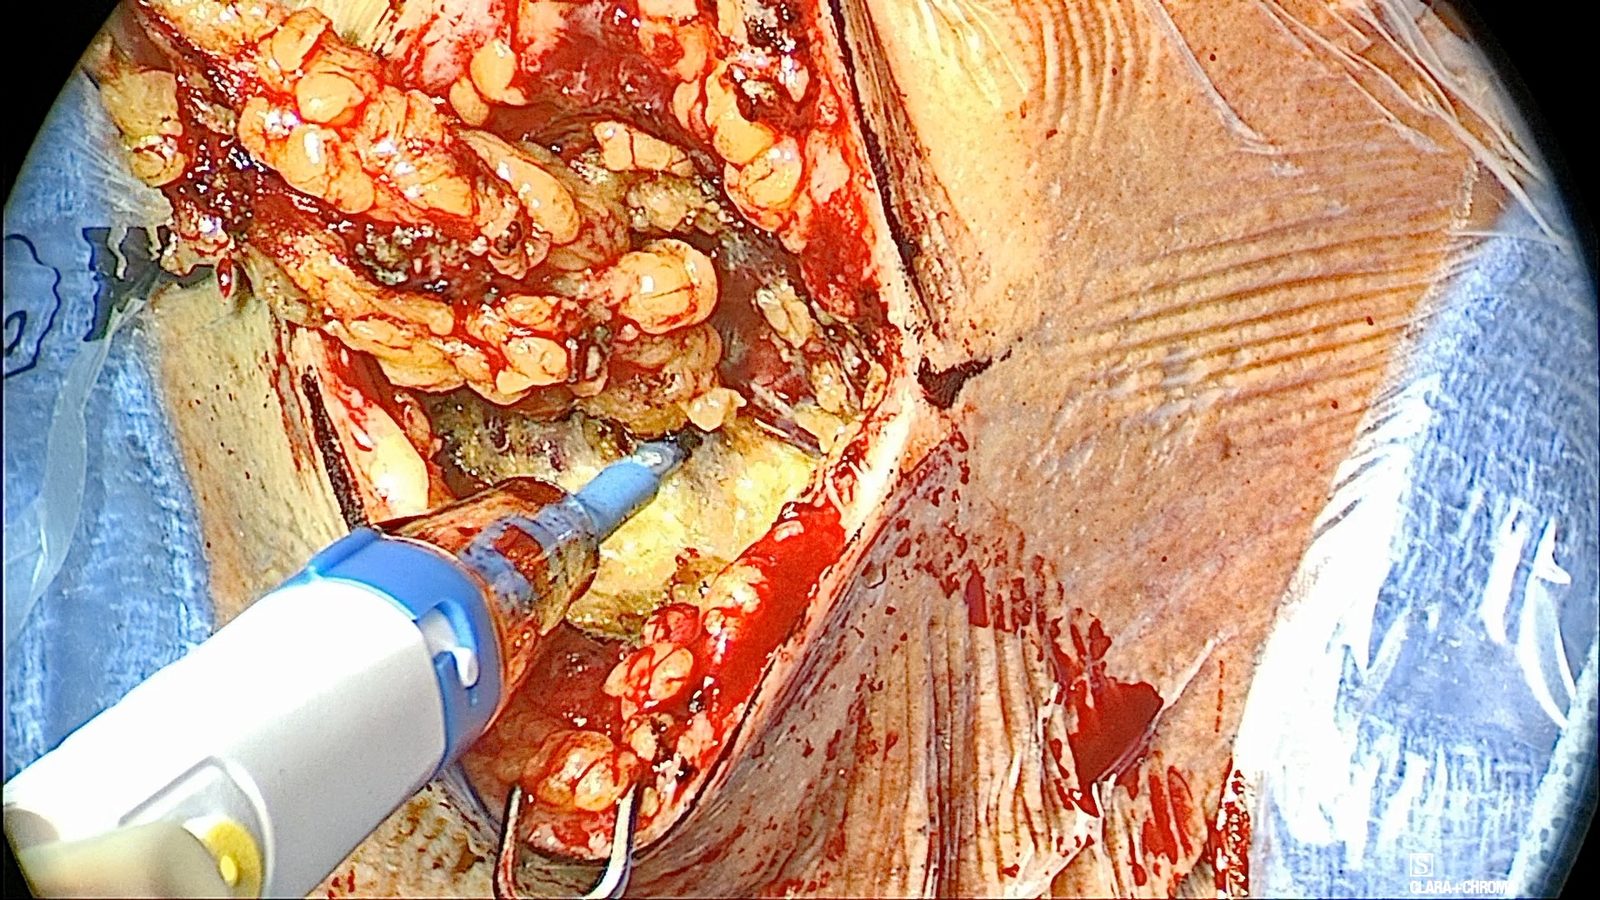
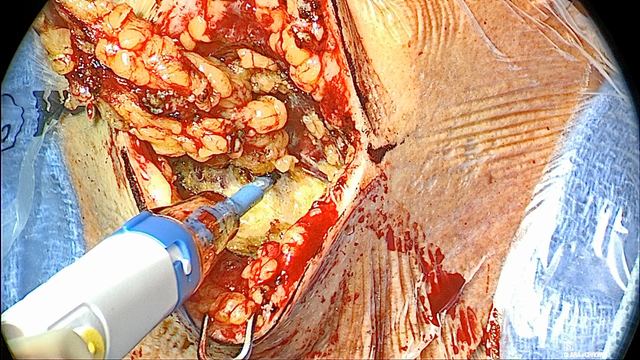
Defat level IA. Remove the level IA fat over the mylohyoid and the anterior bellies of the digastric to create working space. Expect the mylohyoid to be visible in the midline; the digastric may be more or less visible.
Defatting also serves the implant. The published technique recommends keeping the implant’s antenna less than 3.5 cm from the skin surface, and removes fat superficial or deep to the platysma when needed.
Level IA fat removed over the mylohyoid
The level IA fat is removed to expose the mylohyoid beneath it.
Identify the digastric and mylohyoid. Identify the anterior bellies of the digastric and the horizontal fibers of the mylohyoid.
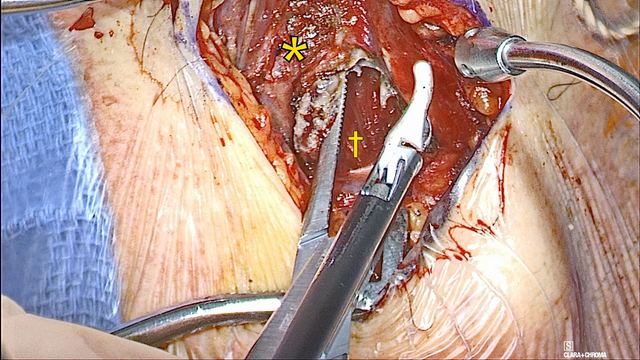
Divide the mylohyoid in the midline. Divide the mylohyoid vertically in the midline, from the hyoid toward the mandible. Use the hyoid as the inferior limit, keep the division on the midline, and carry it all the way up to the mandible, slightly higher if needed.
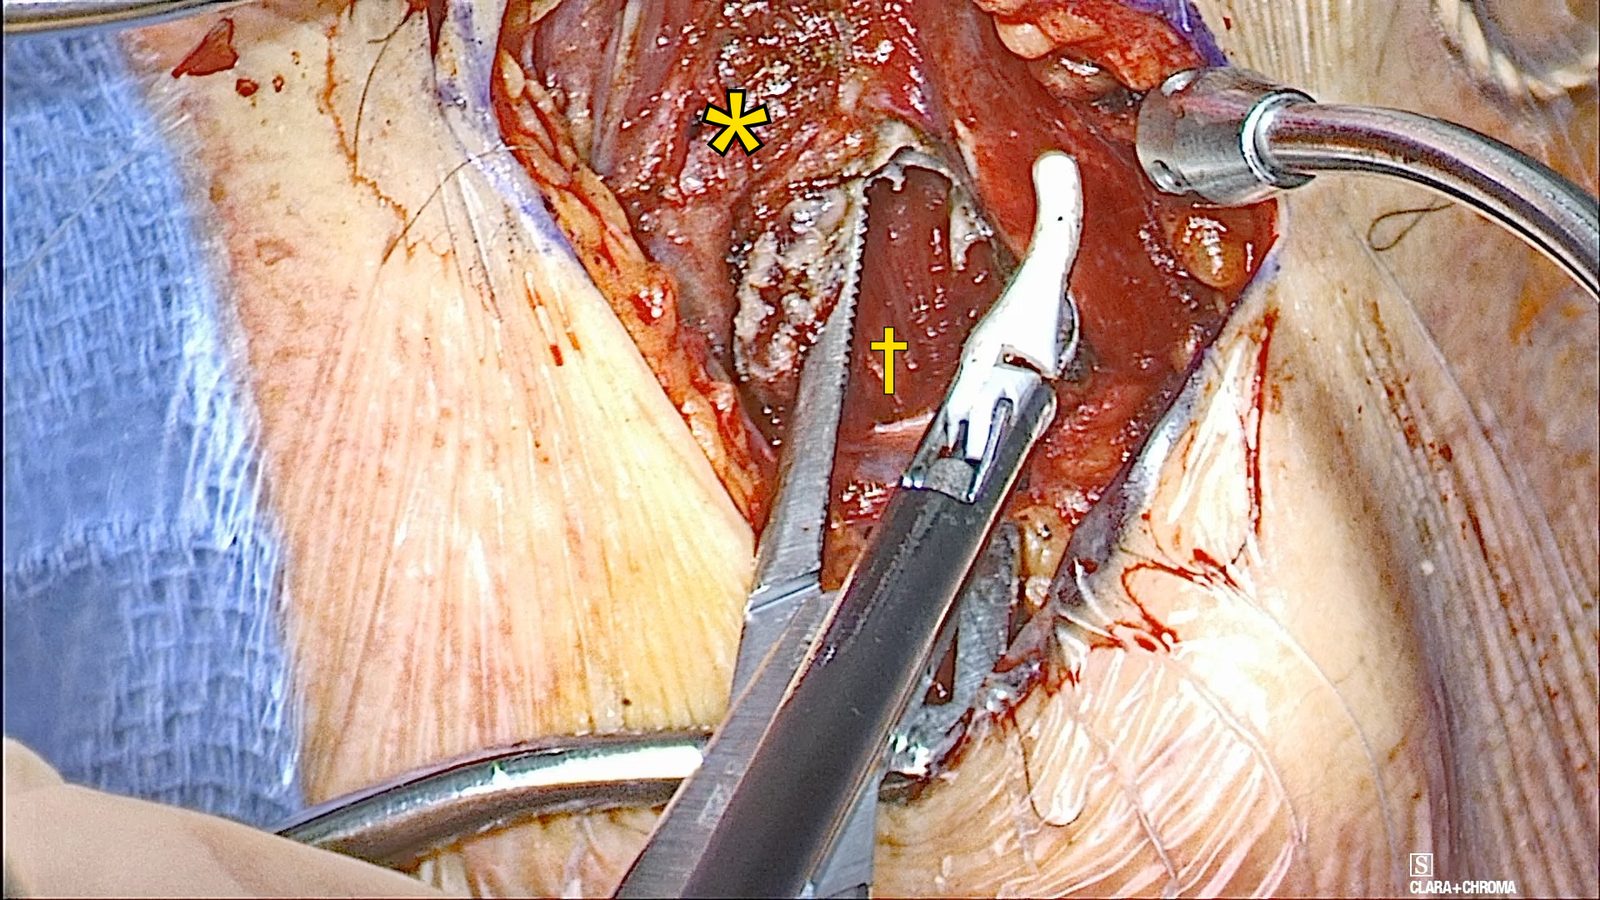
Beneath the mylohyoid, the geniohyoid fibers run vertically. Where horizontal fibers remain, mylohyoid still needs to be divided.
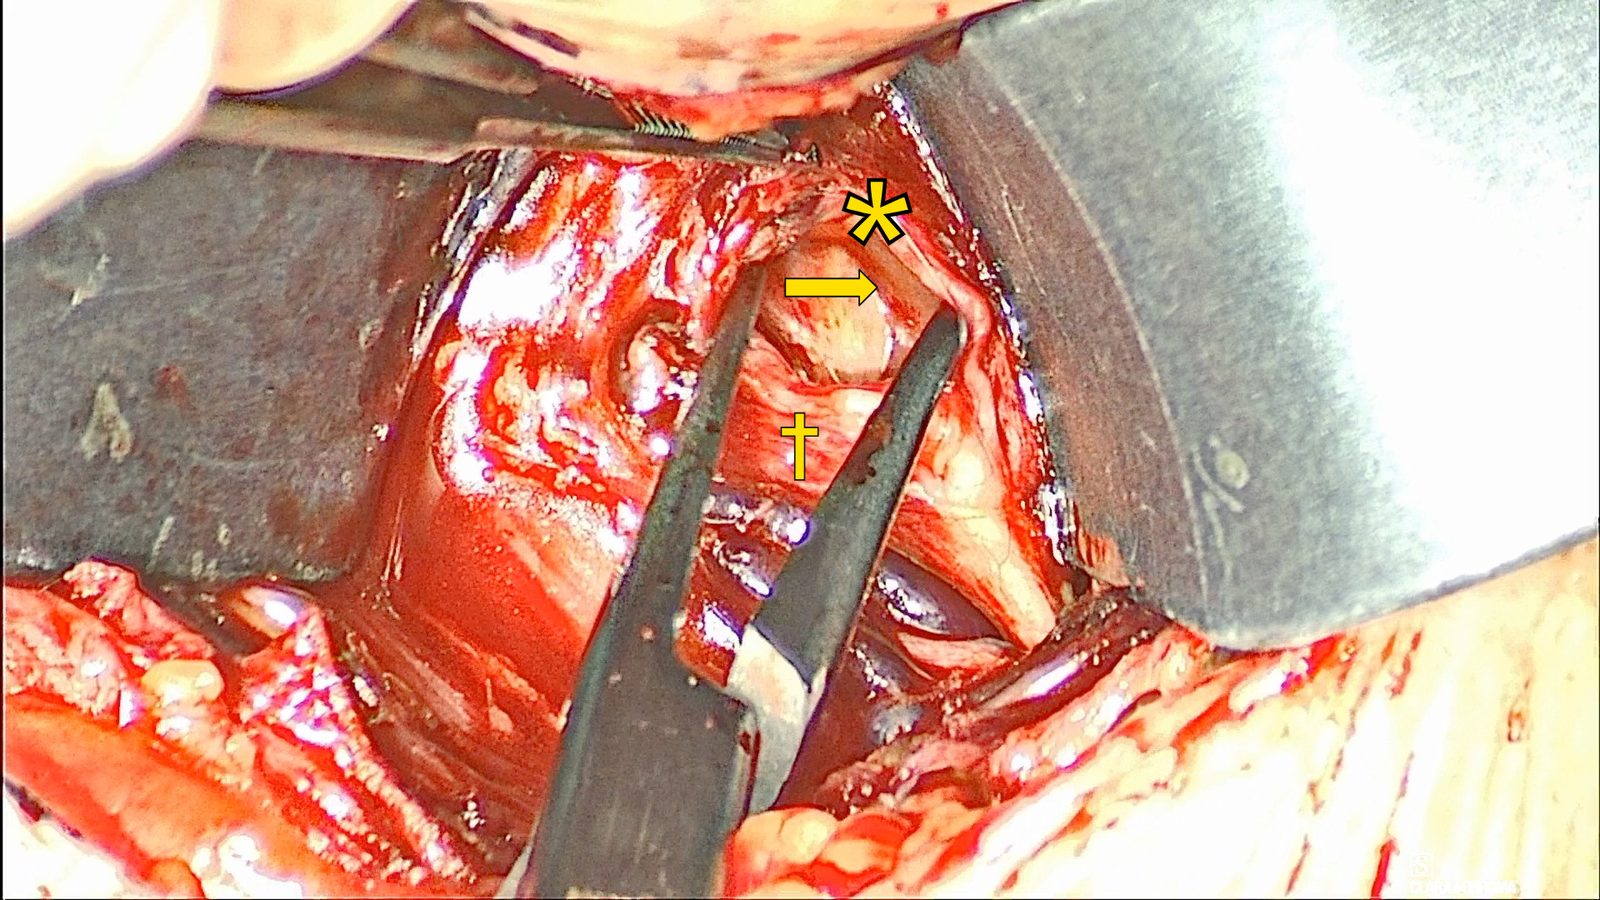
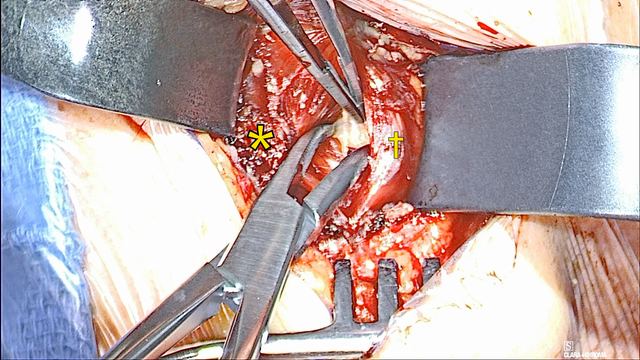
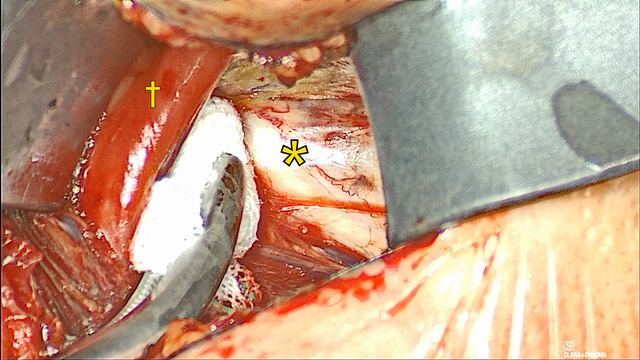
Mylohyoid divided over the geniohyoid
The mylohyoid (*) is divided in the midline over the vertical fibers of the underlying geniohyoid (†).
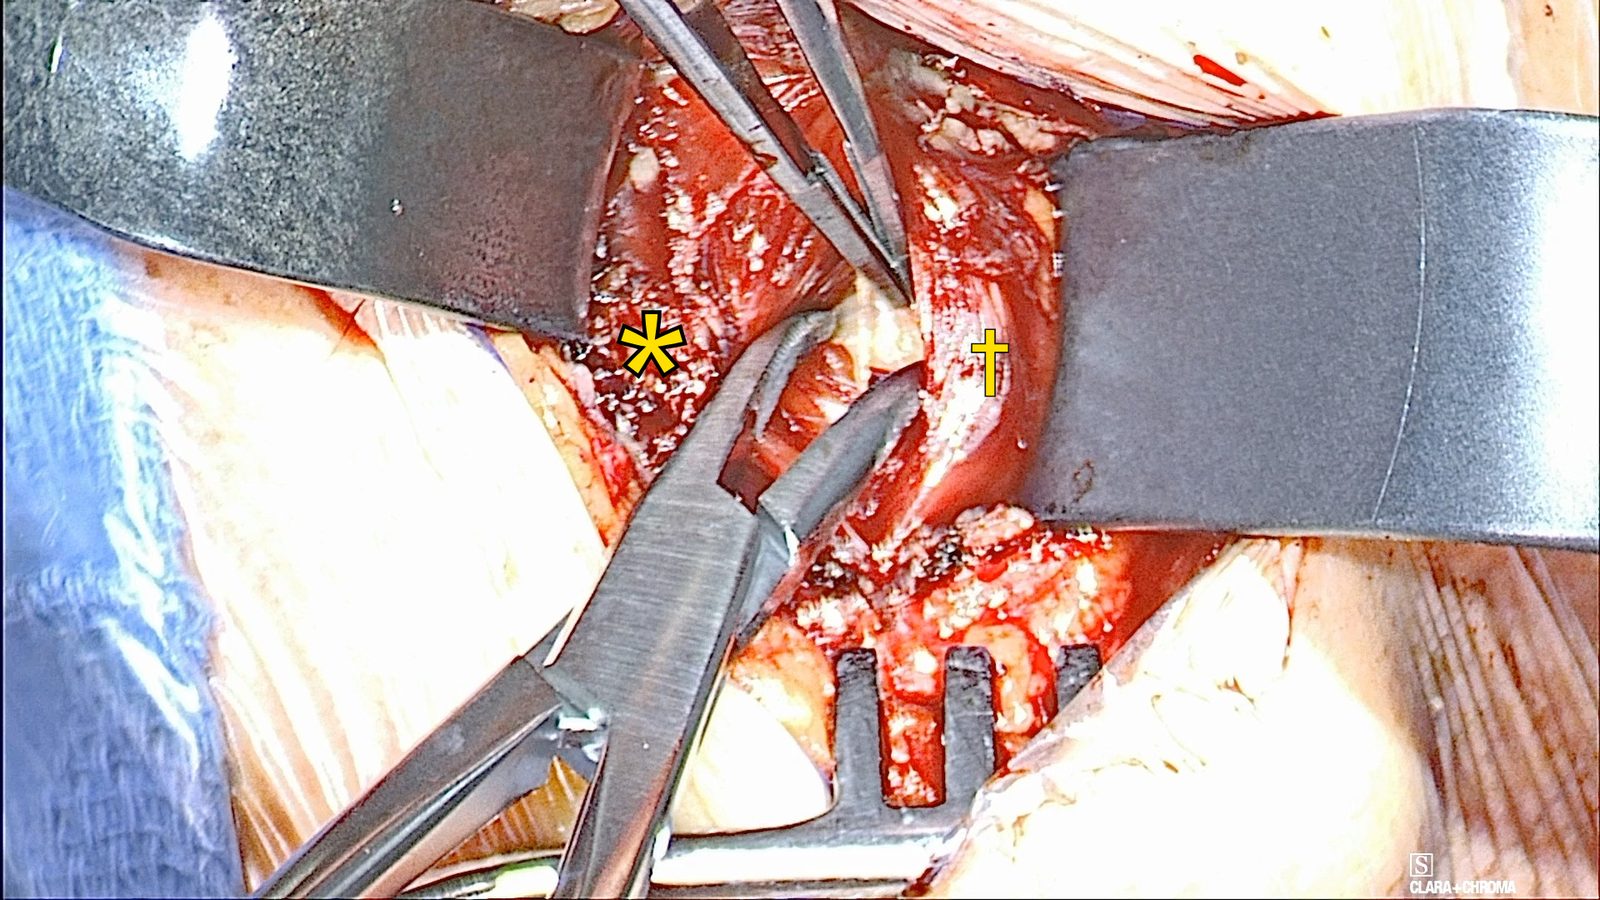
Split the geniohyoid at the raphe. Identify the midline fatty raphe and split the geniohyoid muscles to expose the genioglossus.
The geniohyoid may be thicker than expected. It inserts on the hyoid bone, while the genioglossus travels deep to the hyoid. The genioglossus is paler.
Separating the geniohyoid at the raphe
The geniohyoid is separated at its midline raphe. Mylohyoid (*) and geniohyoid (†).
Track laterally from the raphe to the edge of the right genioglossus, open the fat pad beside it, and find the distal hypoglossal nerve. Divide crossing veins that hide its branches.
Work through the steps
Track to the fat pad. From the geniohyoid raphe, track laterally toward the edge of the genioglossus. The nerve lies in the fat pad lateral to the genioglossus.
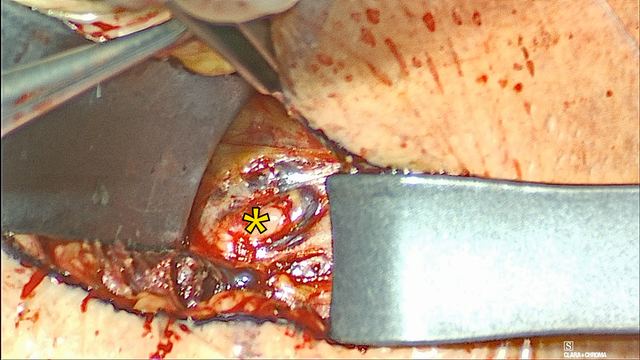
Open the fat bluntly. Open the fat lateral to the genioglossus with blunt dissection and identify the distal hypoglossal nerve.
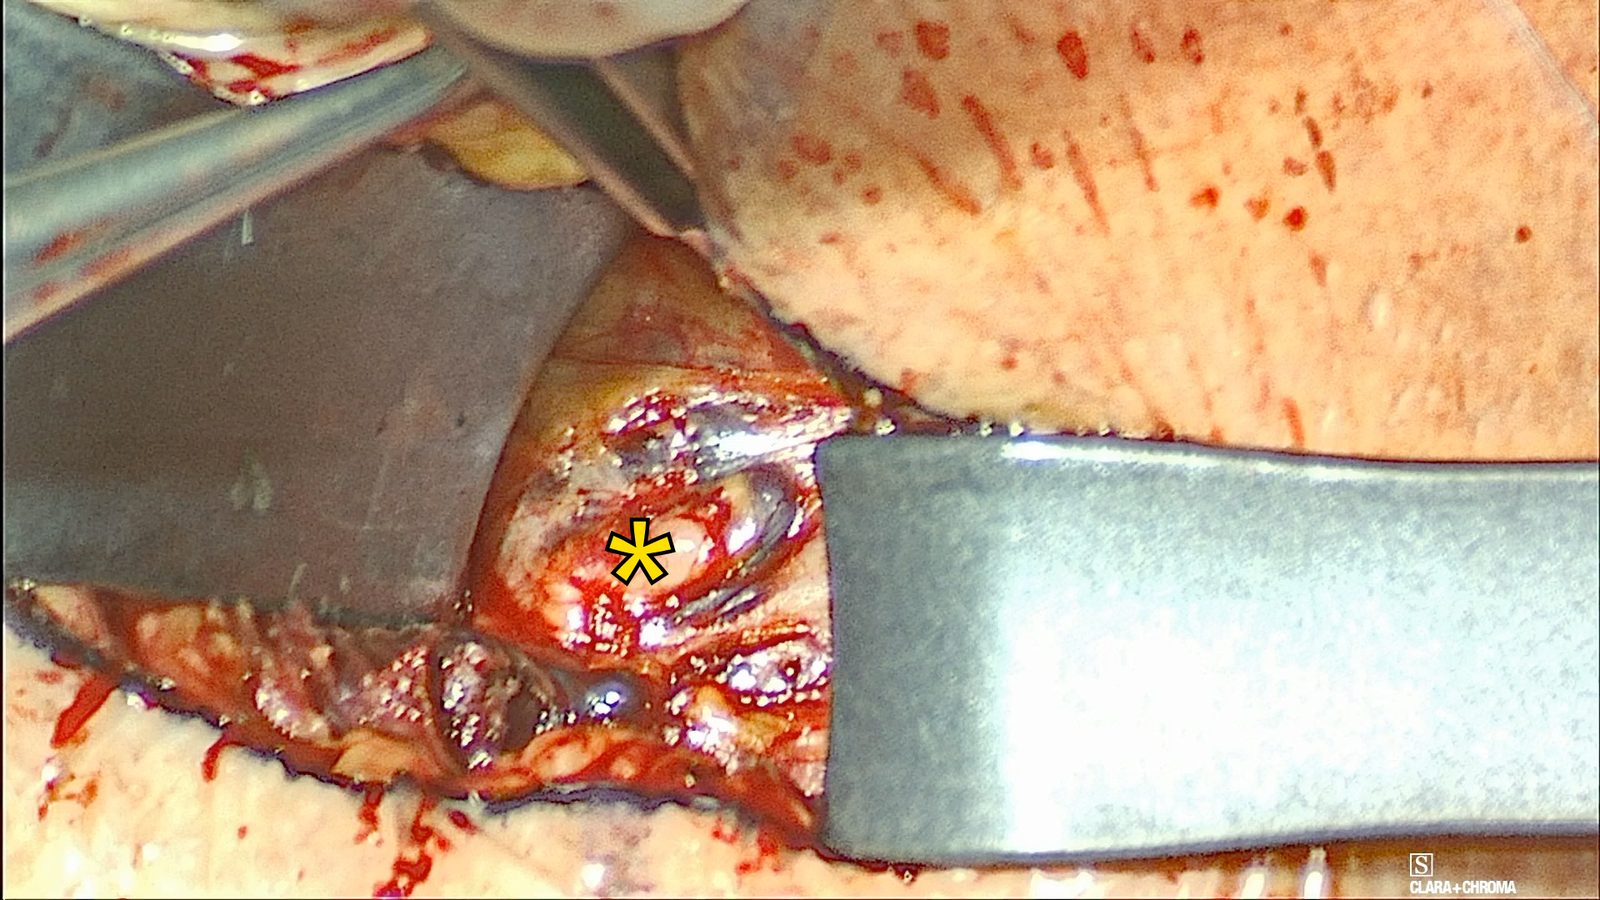
Exposing the right hypoglossal nerve
Blunt dissection in the fat pad lateral to the right genioglossus exposes the right hypoglossal nerve (*).
Divide crossing veins. Divide branches of the ranine vein that cross over the nerve when they block the view of its branches.
Before dividing a vein, stimulate it to confirm that no nerve travels with it. Keep the NIM active while you check tissue for possible nerve involvement.
In the pivotal trial, one patient was not implanted because a ranine vein overlay the hypoglossal nerve and the site surgeon was not experienced with ligating it.
Dissect the nerve from medial to lateral, distal to the hyoglossus edge, and use the NIM to separate the medial protrusor branches from the lateral retrusor branches.
Work through the steps
Dissect from medial to lateral. Dissect the hypoglossal nerve from medial to lateral. Keep the dissection distal to the edge of the hyoglossus muscle.
Retract the nerve medially. Retract the nerve medially with a peanut, gauze, or pledget.
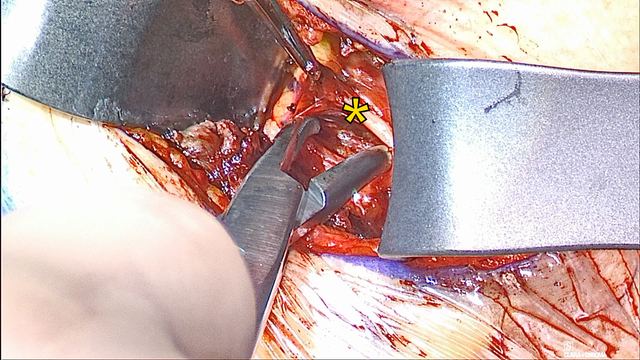
Stimulate with the bipolar probe. Map the branches with the bipolar NIM stimulation probe at 0.1–0.3 mA and 100 µs. Keep the NIM active while checking tissue for possible nerve involvement.
Name each branch. Identify the medial branch to the genioglossus, which is inclusionary (protrusor), and the lateral branch to the hyoglossus, which is exclusionary (retrusor).
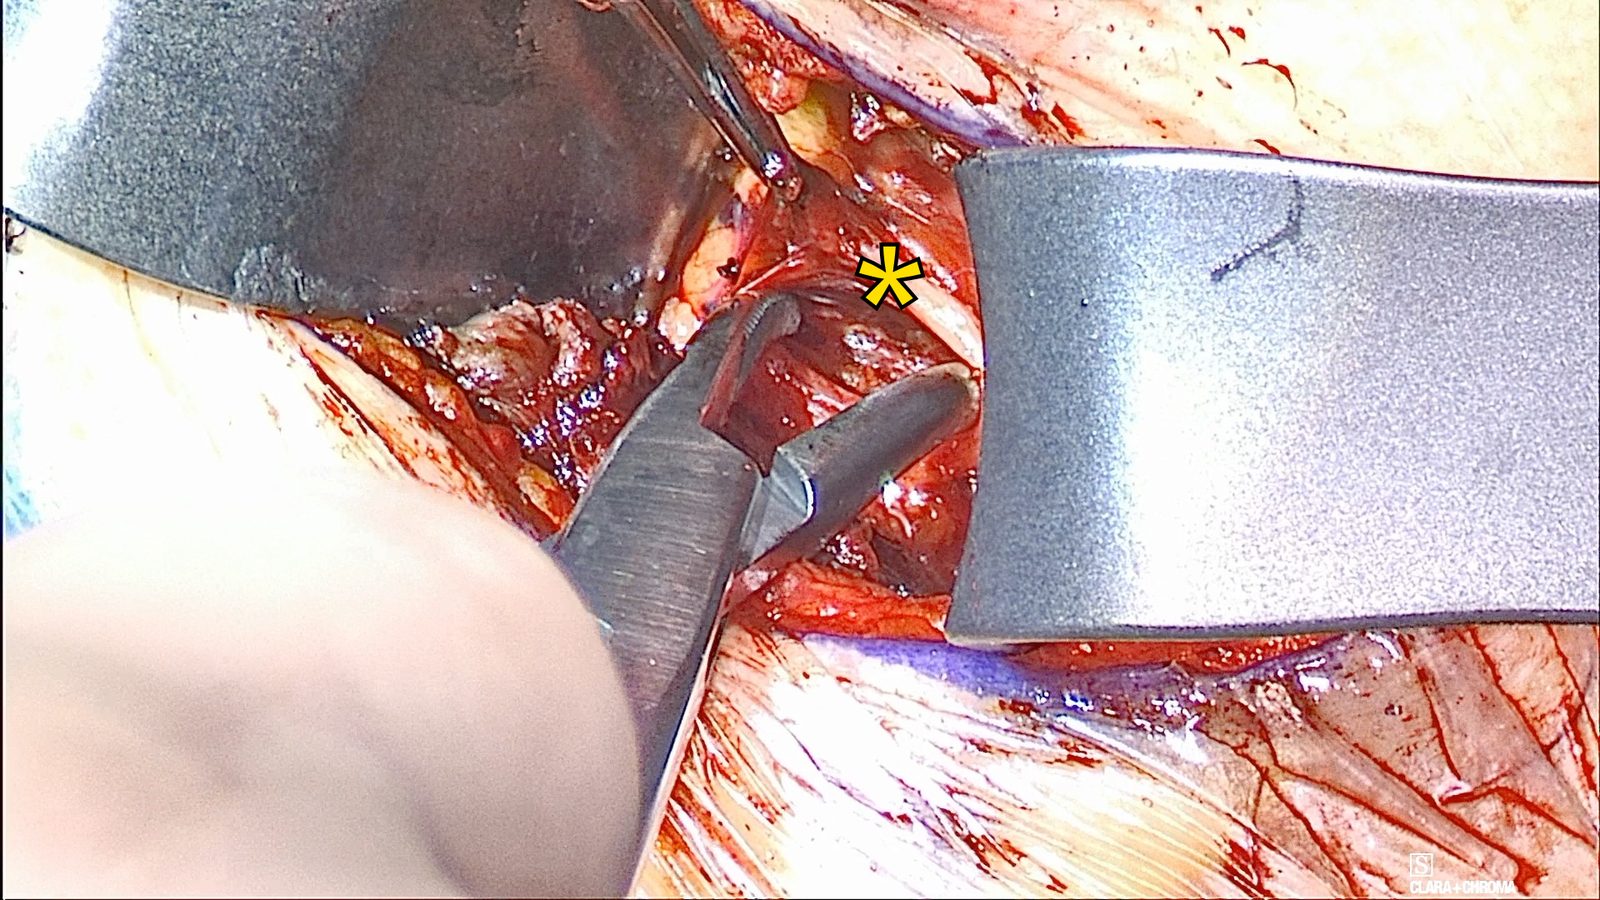
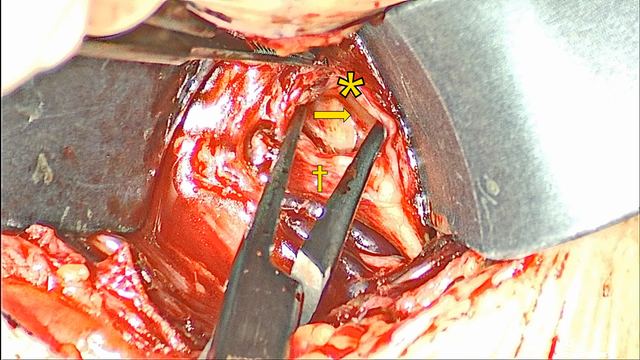
Dissecting the right hypoglossal nerve
The right hypoglossal nerve (*) is dissected from medial to lateral to identify its branches.
Use the Surgical Template to size a generous paddle pocket between the branches, control small veins, and preplace organized fixation sutures before moving to the other side.
Work through the steps
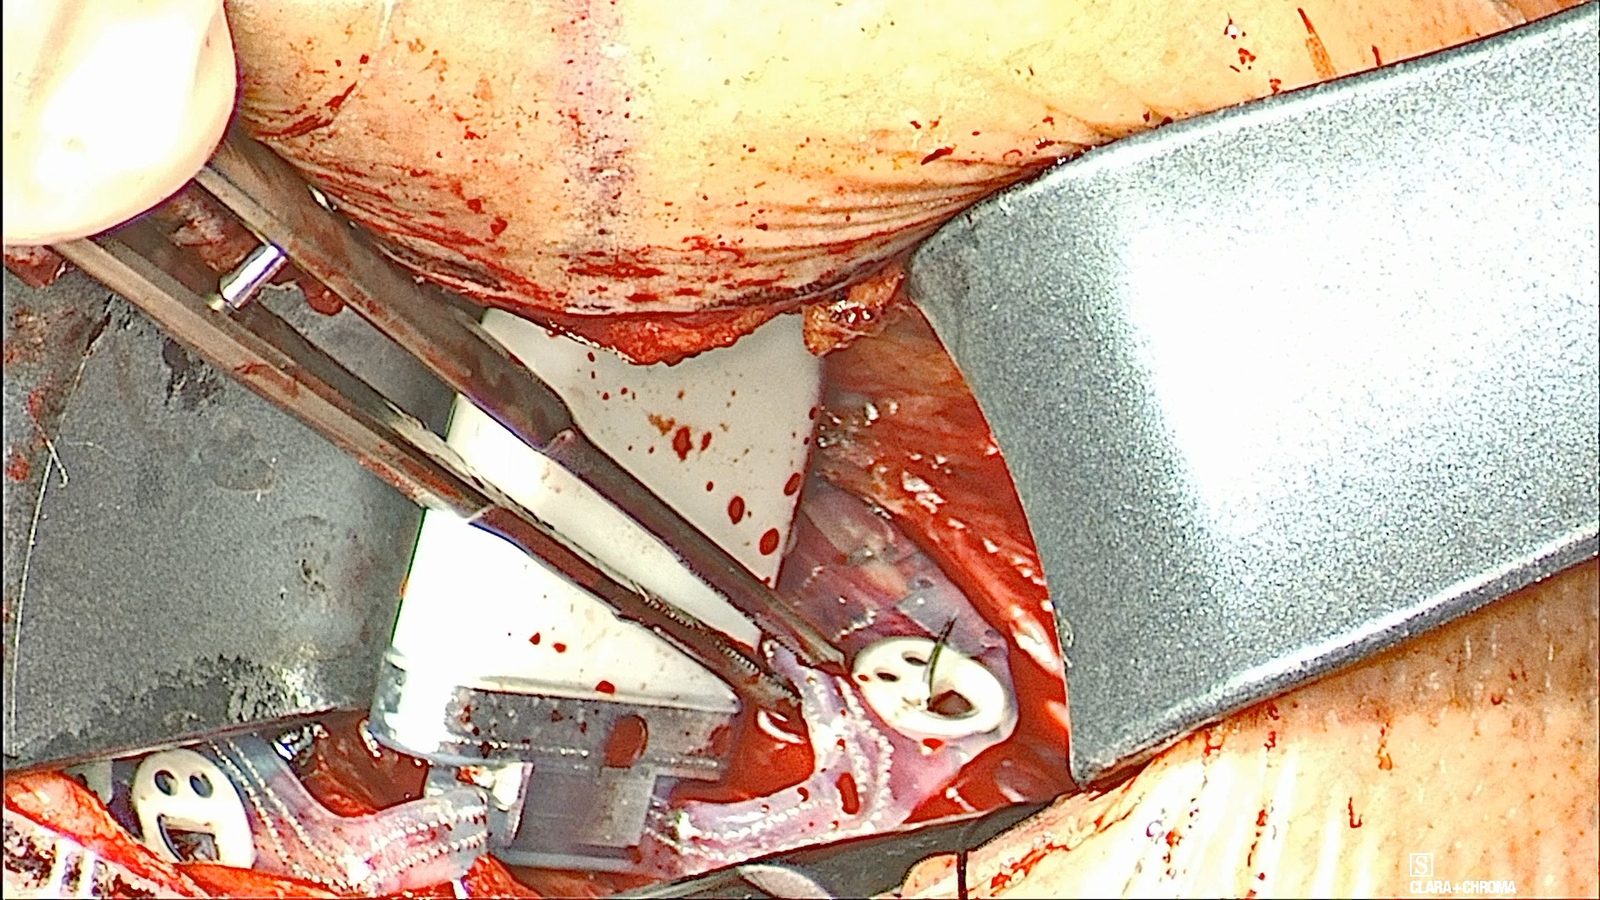
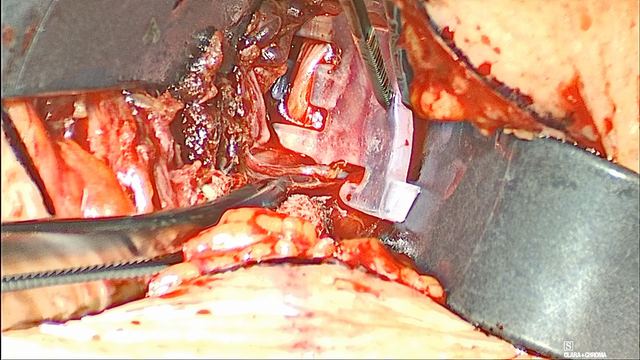
Size with the template. Use the Genio Surgical Template to size the paddle pocket. Assess where the template is under tension and enlarge the pocket at that point.
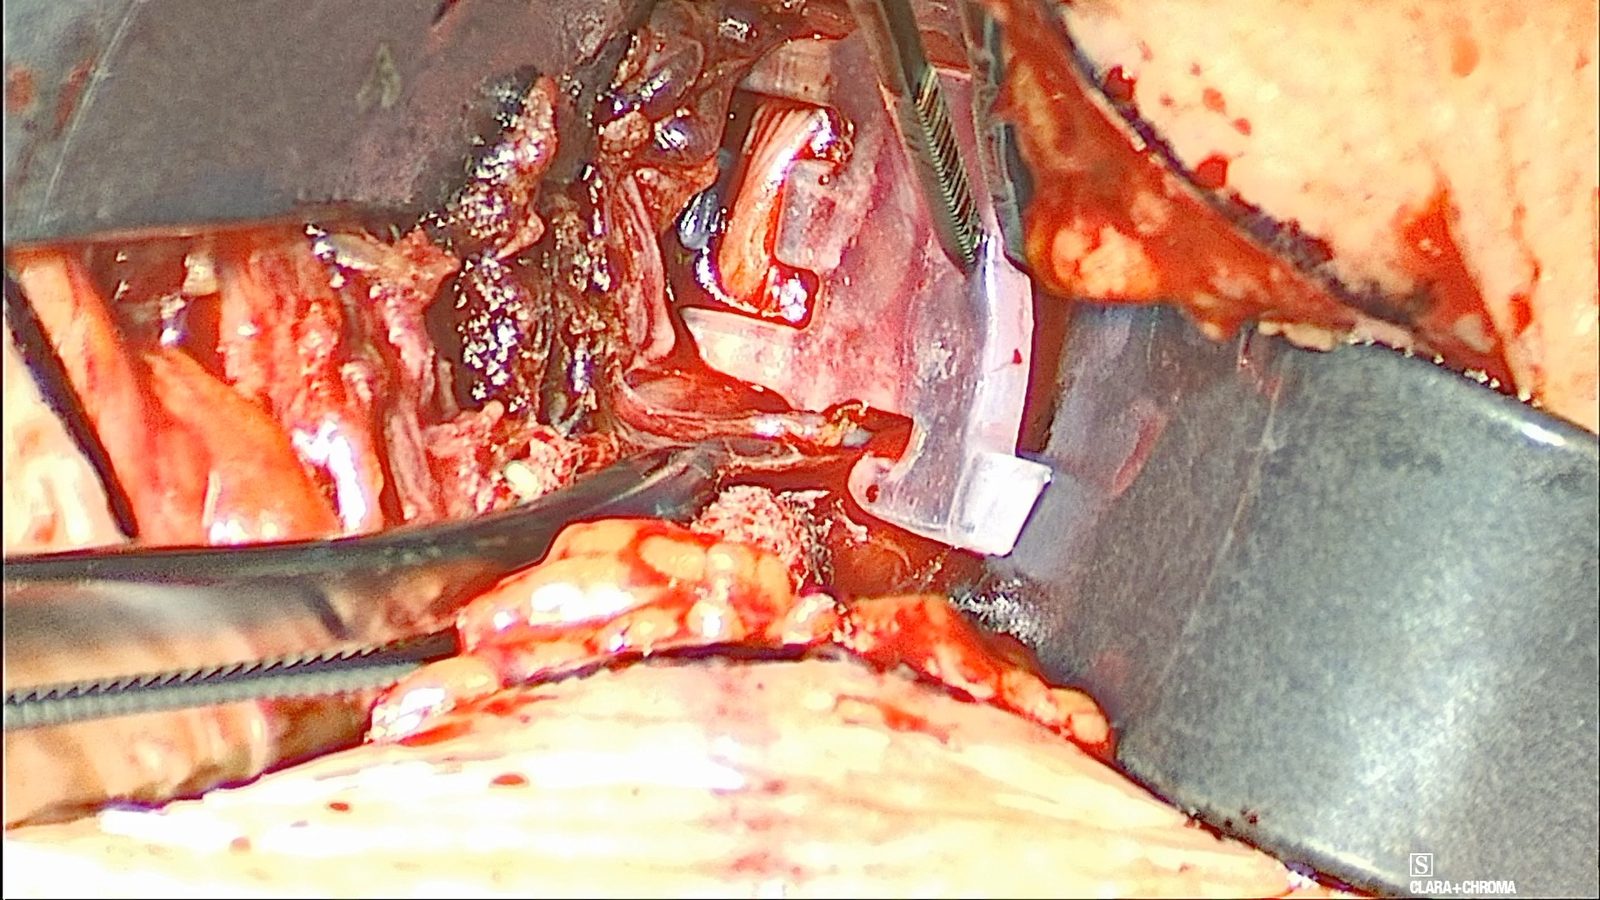
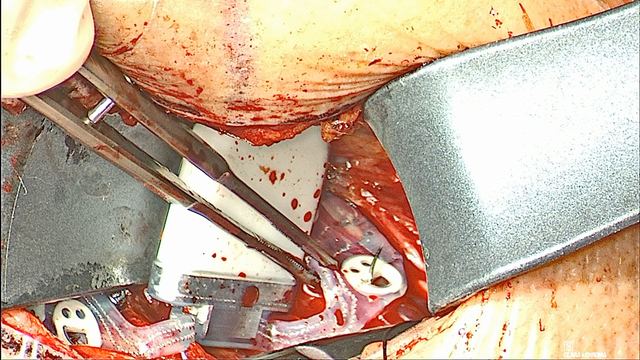
The Surgical Template in the pocket
The right hypoglossal nerve is visible through the Surgical Template’s electrode window.
Make the pocket generous. Create a deep pocket between the two nerve branches. Err toward a larger pocket; it is often about twice as large as first seems necessary. The goal is a paddle that seats without tension, without dissection beyond what the template needs.
Release fascia safely. When more release is needed, open the fascia along the edge of the muscle. Before dividing tension-limiting fascia with an energy device, confirm that no nerve is present.
Expect small veins. Spreading to create the pocket can open small veins beneath the nerve. Use a less sharp instrument where vessels lie.
Control oozing. For oozing from vessels between the branches, hold pressure first; it is normally sufficient. Use bipolar if needed.
Preplace the fixation sutures. Use the template to preplace 2-0 silk fixation sutures where no vein overlies the target tissue. Tag the guide stitches off to the sides and keep them organized.
Protect the first side. Leave a pledget in the field, place a neuro patty over the prepared side, and move to the contralateral side.
Dr. Nord’s teaching
Make the paddle pocket as large and deep as possible. Assess where the template is under tension and enlarge the pocket there; err toward a larger pocket.
Make the nerve pocket approximately twice as large as initially seems necessary.
Use a less sharp instrument when deepening the pocket where blood vessels lie.
For oozing between the branches, hold pressure first. It is normally sufficient; use bipolar if needed.
Parachute the fixation stitches into position, and keep them organized so they do not become confused.
Pitfalls
Making the pocket too small, so the template, and later the paddle, sits under tension.
Dividing tension-limiting fascia with an energy device before confirming that no nerve is present.
Placing a fixation stitch through tissue with an overlying vein.
Letting the guide stitches tangle, which makes the final seating harder.
Before moving on: Show a pocket that accepts the template without tension and organized, tagged fixation sutures before starting the other side.
Genio System 2.1 Surgeon Manual (FDA labeling). Patient-population warnings, MRI conditions, implantation steps, and the intraoperative test criteria. Verified September 22, 2026; consult the current version.
Lesson 07About 6 minGenio
Dissect the left side
Protect the prepared right side, then repeat the exposure and mapping on the left, using the hyoglossus edge to confirm the dissection is distal enough.
Work through the steps
Protect the first side. Place a neuro patty over the prepared right side before dissecting the left.
Sweep the genioglossus medially. Bluntly sweep the left genioglossus medially to identify the lateral fat pad and the hypoglossal nerve.
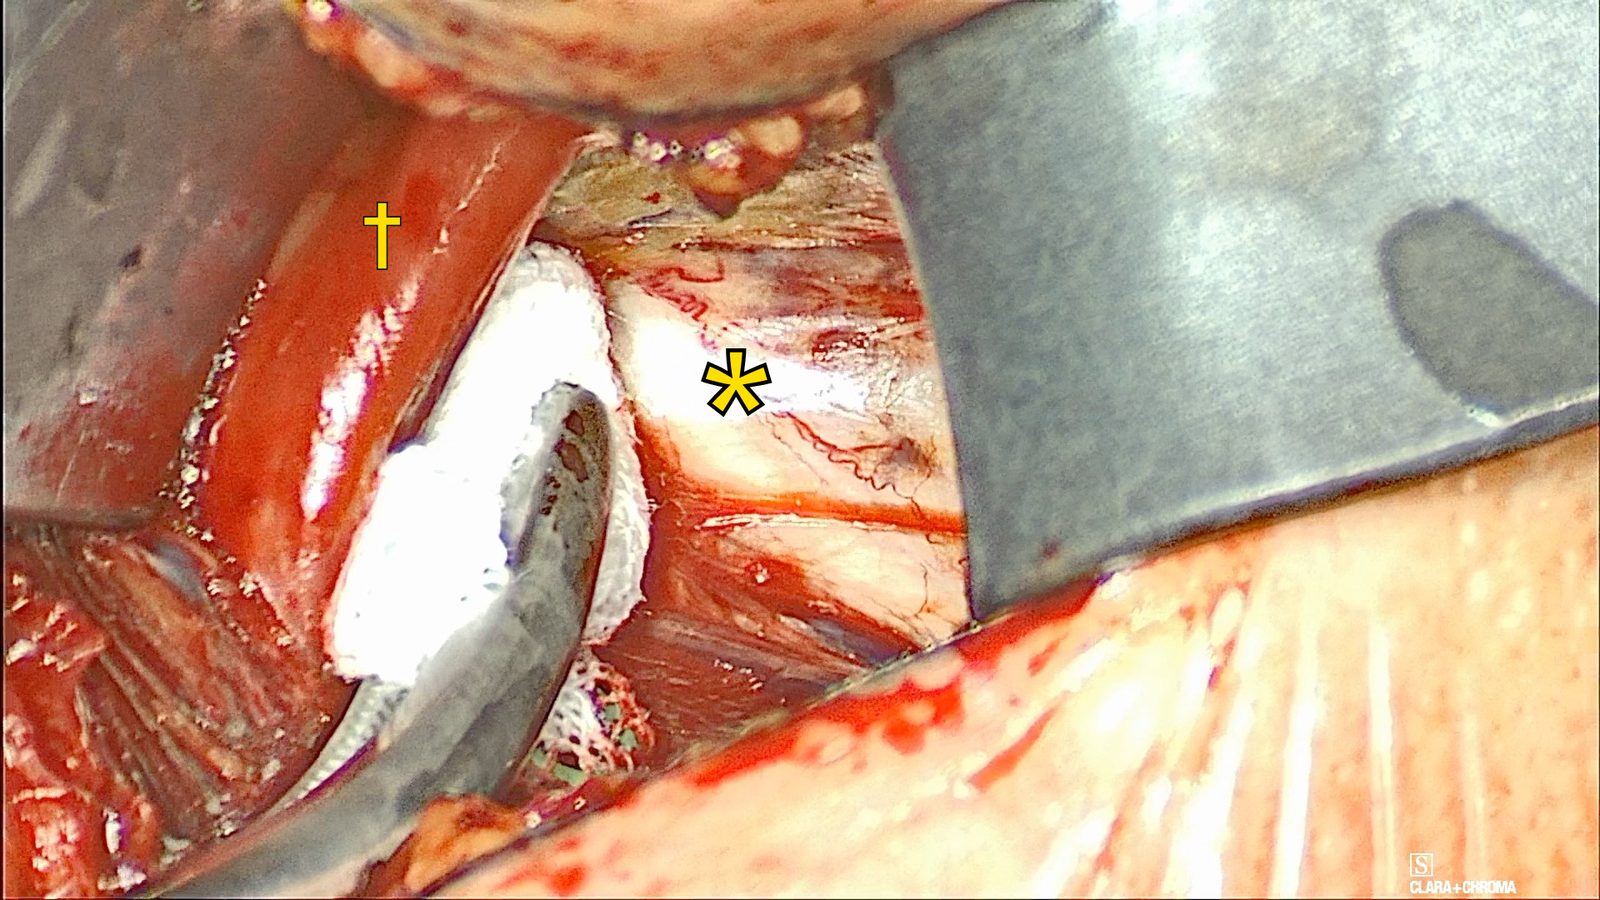
The left hypoglossal nerve
Left hypoglossal nerve (*) and left genioglossus (†). A pledget sweeps the genioglossus medially to open the lateral fat pad.
Seat the implant over the genioglossus like a saddle, with each paddle’s electrodes facing the inclusion branches, and secure it without tension.
Work through the steps
Position the implant. Position the Genio Implantable Stimulator over the genioglossus like a saddle. The lateral paddles straddle the genioglossus, with the electrodes facing the inclusionary branches.
Handle it gently. Handle the implant by its suture tabs, the small “smiley faces,” rather than by the adjacent areas. Avoid sharp instruments, traction on the shoulders, and metal instrument contact with the electrodes.
Once the implant is in, avoid electrocautery. If it is needed, use bipolar, keep the tip off the implant, and check the device afterward.
Secure the left paddle. Secure the left paddle to the genioglossus with 2-0 silk through the dedicated suture holes.
Pass needles only through the dedicated suture holes; puncturing the implant causes it to malfunction. Use braided non-absorbable suture. The labeling warns that absorbable sutures let the implant loosen over time.
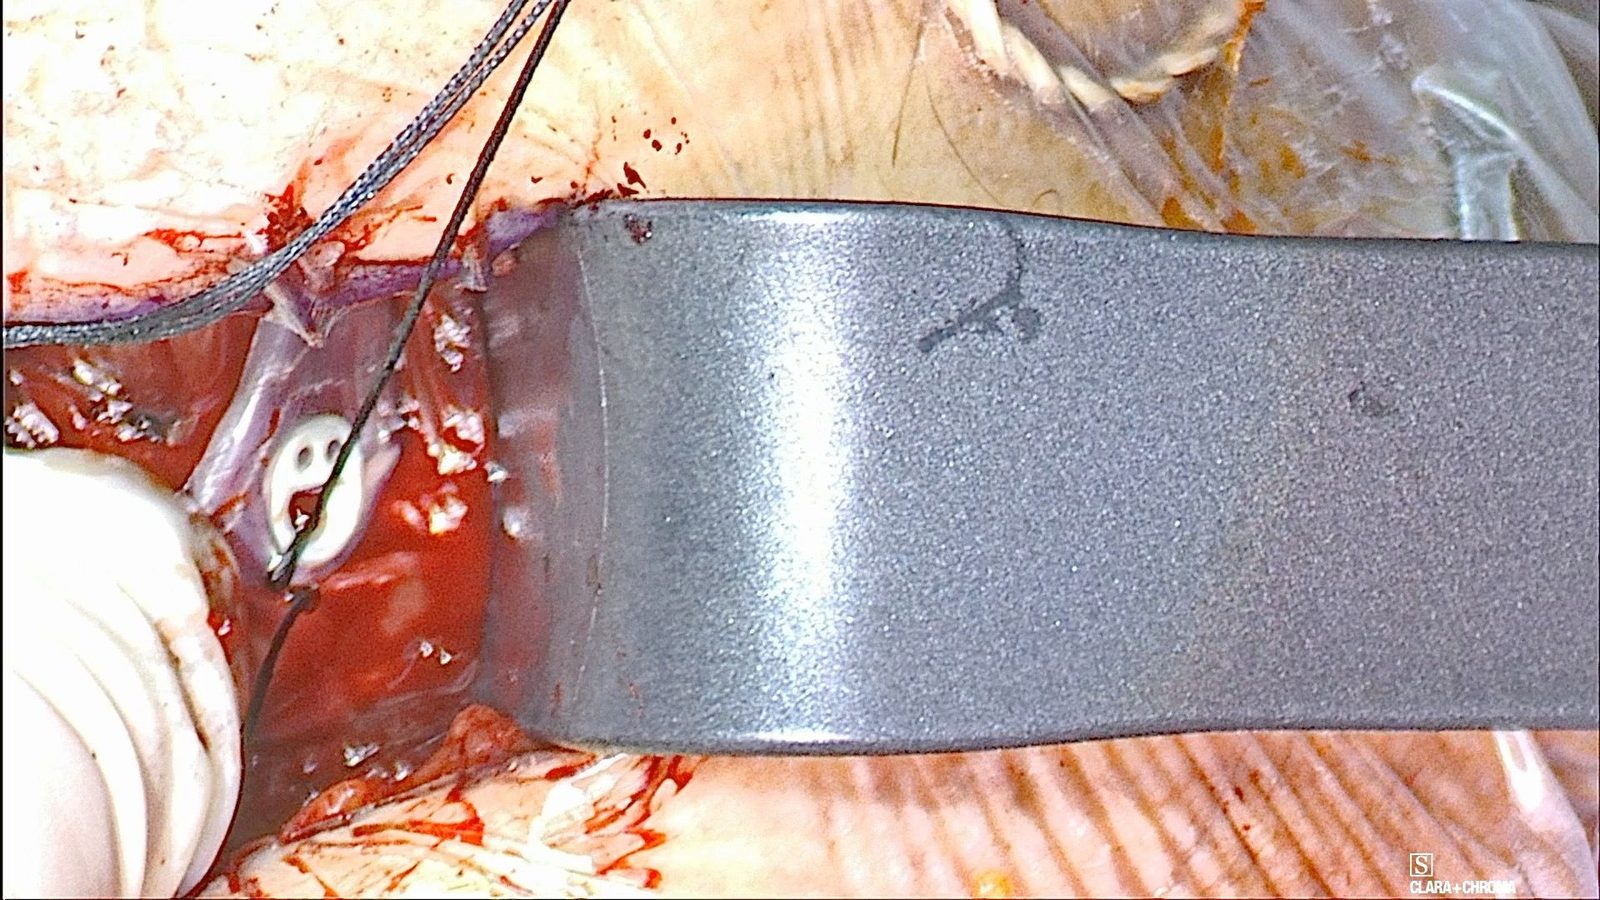
Placing the left paddle
Placement of the left implant paddle against the genioglossus.
Seat the right paddle. Seat the right paddle and secure it with the preplaced 2-0 silk fixation sutures. Get the stitches through before worrying about final positioning, then complete the seating.
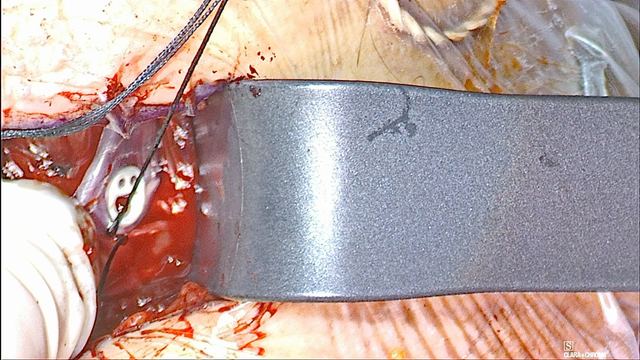
Placing the right paddle
Placement of the right implant paddle, seated with the preplaced fixation sutures.
Check the position. Position the exclusion bridge so it sits almost on top of the flange, and seat the implant so it is fully buried in the surrounding tissue.
Tie without tension. Do not pull on the implant while tying the fixation sutures. Keep the secured implant free of tension so it does not tear through the tissue.
In the pivotal trial, two implants that tested well in the operating room gave no stimulation at activation because of presumed postoperative migration. Scar tissue prevented repositioning, and both were removed.
Watch the suture path. Do not route a fixation suture around the implant arm or over the shoulders. Direct fixation sutures away from the vein and the nerve.
Dr. Nord’s teaching
Handle the implant by the little smiley faces rather than gripping the adjacent areas.
The fixation stitches can be parachuted when placing the template or the implant.
Get the fixation stitches through before worrying about final implant positioning, then complete the seating.
Seat the implant so it is fully buried in the surrounding tissue.
Position the exclusion bridge so that it sits almost on top of the flange.
Pitfalls
Pulling on the implant while tying its fixation sutures.
Routing a fixation suture around the implant arm or over the shoulders.
Leaving the implant under tension, so it can tear through the tissue.
Passing sutures toward the vein or the nerve.
Letting a metal instrument touch the electrodes, or grasping the implant with a sharp instrument.
Before moving on: Confirm that both paddles are fully seated and buried, with the electrodes facing the inclusion branches and the fixation sutures clear of the shoulders, the nerve, and the veins.
Published references for this lesson
Genio System 2.1 Surgeon Manual (FDA labeling). Patient-population warnings, MRI conditions, implantation steps, and the intraoperative test criteria. Verified September 22, 2026; consult the current version.
Test with the Activation Chip before closure, work through an absent or weak response, close in layers, and repeat the test through the skin.
Work through the steps
Set up AC/DP testing. Attach the Genio Activation Chip (AC) to a Disposable Patch (DP). Nyxoah field staff configure the chip with the Genio Sleep Lab Application. Place the AC/DP in a sterile sleeve and position it over the implant to activate the Implantable Stimulator.
Apply the response criteria. Check for symmetric, bilateral tongue protrusion, at least past the lower incisors and without retraction or twisting, both visually and on the NIM. Test down to 1% amplitude.
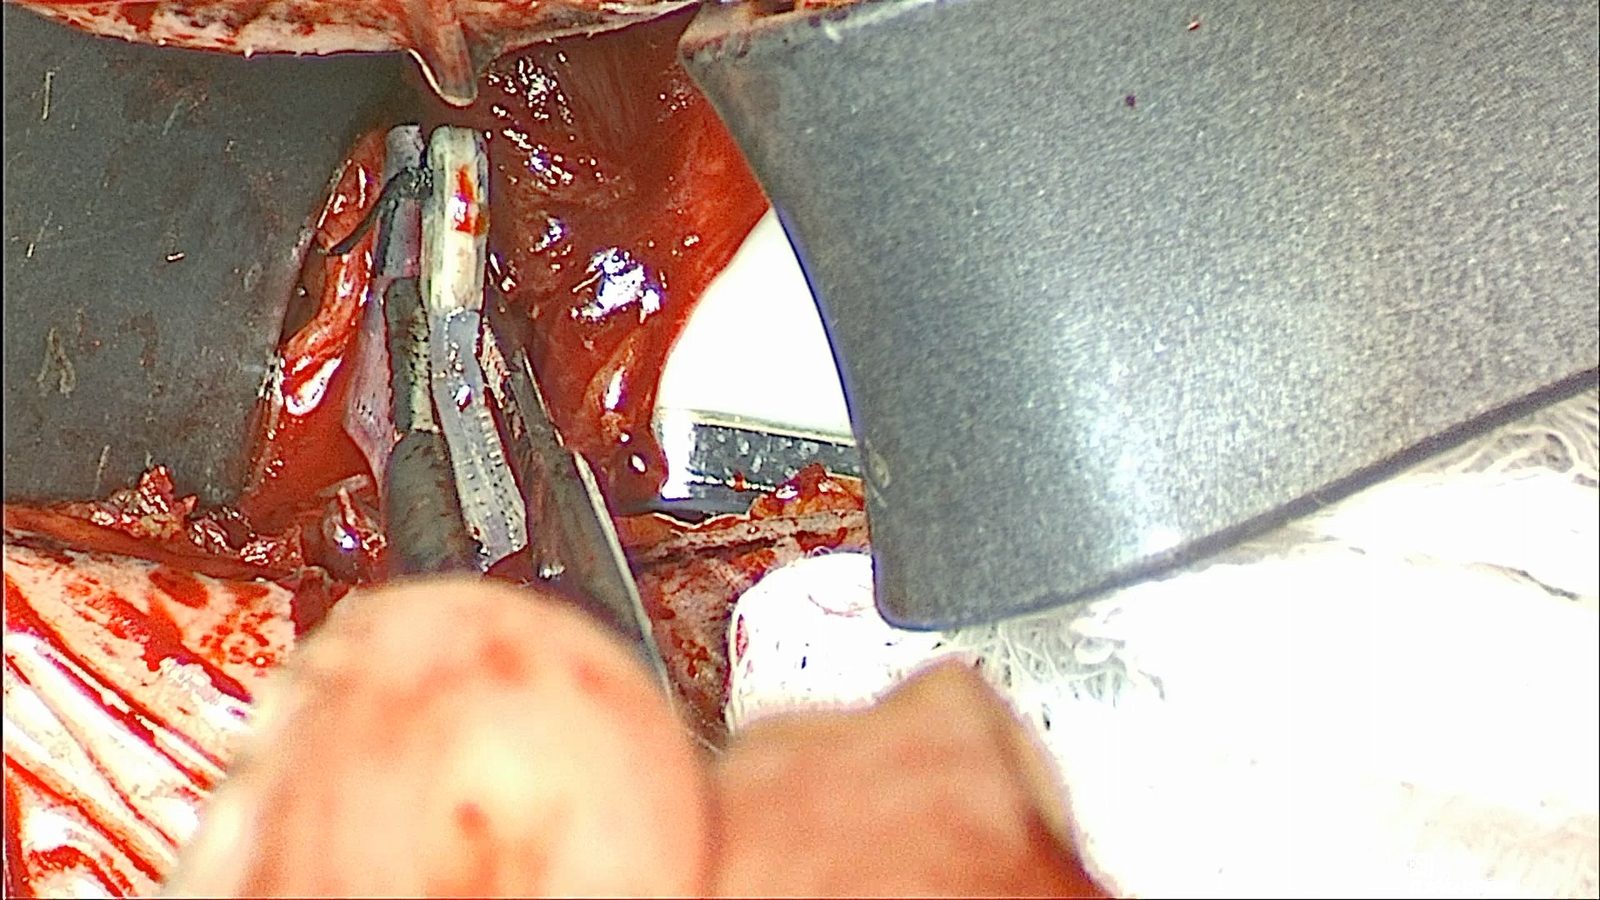
Tongue response during AC/DP testing
Tongue response during AC/DP testing before skin closure.
Reposition when the response falls short. If an appropriate response is absent or requires more than 20% amplitude, reposition the implant and repeat testing. If there is no stimulation on either side, remove the implant to inspect and reposition it.
In the pivotal trial, one patient was not implanted because the tongue retracted during intraoperative testing despite repositioning.
Look beyond position. If an electrode is visibly over the nerve but stimulation is absent, investigate other causes rather than assuming position alone. As current increases it should spread, so an electrode about a millimeter off should not produce a completely absent response.
At low stimulation levels, the response can become more position-sensitive.
Closure and final test
Close in layers. Close the incision in layers.
Test again through the skin. Repeat the AC/DP test after skin closure, using the same response criteria. Confirm effective stimulation and airway opening.
Dr. Nord’s teaching
At low stimulation levels, recognize that the observed response may become more position-sensitive.
If an electrode is visibly directly over the nerve but stimulation is absent, investigate other causes rather than assuming position alone.
As current increases it should spread, so an electrode about a millimeter off should not produce a completely absent response.
If there is no stimulation on either side, remove the implant to inspect and reposition it.
Pitfalls
Accepting a response that needs more than 20% amplitude instead of repositioning and retesting.
Accepting protrusion that comes with retraction or twisting.
Assuming that electrode position alone explains an absent response when the electrode is visibly over the nerve.
Skipping the repeat test after skin closure.
Before moving on: Confirm symmetric protrusion without retraction or twisting, down to 1% amplitude, before closure and again after skin closure.
Published references for this lesson
Genio System 2.1 Surgeon Manual (FDA labeling). Patient-population warnings, MRI conditions, implantation steps, and the intraoperative test criteria. Verified September 22, 2026; consult the current version.
Activate the implant no sooner than eight weeks after surgery. Then choose the patch site and set the starting amplitude and pulse width, first with the patient sitting up and then lying flat under flexible laryngoscopy. This is Dr. Nord’s workflow, which he describes as a work in progress.
Work through the steps
Wait eight weeks. The FDA-approved Surgeon Manual says the implant should not be activated for eight weeks after surgery, including revision or replacement surgery, to allow proper healing. In the pivotal trial, activation was at 2 months.
Know the equipment and the units. The Activation Chip (AC) is the reusable external unit that powers the Implantable Stimulator through the skin. It attaches to a single-use Disposable Patch (DP), which sticks under the chin and carries the chip’s energy to the implant. Nyxoah field staff program the chip with the Genio Sleep Lab Application at the physician’s direction, including each change in the steps below. Patients can change only the amplitude, with the optional smartphone app, between lowest and highest limits set at the visit. Amplitude is set in percent; pulse width is set in microseconds (µs).
Sitting up: find the patch site. Set stimulation to pulse at a regular interval. Hold the Activation Chip in its patch, with the backing still on, under the chin. Find the spot where tongue protrusion is most bilateral and consistent.
Note how position-sensitive that spot is. Does a small shift change the movement?
Sitting up: apply the patch and set a functional amplitude. Remove the backing and apply the patch at that spot. At a 120 µs pulse width, raise the amplitude until protrusion is functional and comfortable. This is the functional amplitude.
Lying flat: look at the airway. Lay the patient flat and perform flexible laryngoscopy with the velopharynx and tongue base in view, the mouth closed, and the patient breathing normally. At the functional amplitude, look for bilateral tongue base advancement, epiglottic advancement, and any soft palate or lateral wall opening.
Flexible laryngoscopy during stimulation: 7% and 10% amplitude 0:19 · Ryan Nord, MD · Silent
What it shows: Stimulation at a 120 µs pulse width, first at 7% amplitude and then at 10%; the response cycles about every 4 seconds. At 7%, the epiglottis moves forward a little with each stimulation. At 10%, the movement appears larger and more of the laryngeal inlet opens with each cycle, although the scope sits closer in this segment. The view shows the epiglottis and laryngeal inlet; the velopharynx is out of view.
Lying flat: find the provisional upper limit. Increase the amplitude in 1% steps until there is subtle discomfort or the airway is widely open. Dr. Nord treats that level as his provisional upper limit.
Lying flat: compare pulse widths. Return to the functional amplitude and compare 120, 150, and 180 µs. Then repeat one or two amplitude steps higher.
Ask two questions. Does 5% at 180 µs open the airway differently than 7% at 120 µs? Which is more comfortable?
If the opening pattern does not depend on pulse width, Dr. Nord programs near the functional amplitude at 120 µs.
These are starting settings. Therapy is then optimized over the following months, including titration during sleep studies.
Dr. Nord’s teaching
A longer pulse width delivers more charge at the same amplitude. Judge each setting by the airway opening and the patient’s comfort.
In Dr. Nord’s workflow, upright protrusion finds the patch site and a functional amplitude; the settings are then judged lying flat, where you can see the airway.
If the opening pattern does not depend on pulse width, program near the functional amplitude at 120 µs.
Pitfalls
Reading the pulse width as milliseconds. It is set in microseconds: 120 µs is 0.12 ms.
Judging the settings only by upright tongue protrusion. In Dr. Nord’s workflow, the airway is checked lying flat before the settings are chosen.
Activating sooner than eight weeks after surgery.
Before moving on: Explain when the implant may be activated, how you choose the patch site, and how you set the functional amplitude, the provisional upper limit, and the pulse width.
Published references for this lesson
Genio System 2.1 Surgeon Manual (FDA labeling). The eight-week interval before activation; who programs the Activation Chip; pulse length 50 to 250 µs and amplitude in percent; therapy optimization over months. Verified October 21, 2026; consult the current version.
These checks support preparation and discussion. Completion and quiz scores do not establish operative competence or replace supervised surgical training and the current device instructions.
What DISE shows: the collapse patterns behind implant candidacy.
Teaching sources
The pathway draws on Dr. Nord’s operative teaching: his step-by-step Genio technique, labeled operative photographs, and surgical pearls from his recorded teaching during Genio cases. Published references are listed beside each lesson and below.
The recommendations present a teaching approach for supervised implant surgery. Use the Genio instructions for use for device-specific handling. Confirm current labeling and your supervising surgeon’s plan before the case.
The Genio implant. It has no battery or software and receives energy through the skin from the Activation Chip. It sits over the genioglossus like a saddle, with a paddle on each side.
Paddles
The two lateral arms of the implant. Each carries the electrodes that face the inclusion branches on its side.
Shoulders
The flexible connections between the implant’s body and its paddles. Avoid traction on them, and never suture over them.
Suture tabs
The paddle tabs with dedicated suture holes, shaped like a smiley face. Needles pass only through these holes.
Activation Chip (AC)
The reusable external unit, with its own battery, that powers the implant each night.
Disposable Patch (DP)
The single-use adhesive patch that holds the Activation Chip under the chin and carries its energy to the implant.
Surgical Template
A sizing guide used to shape the paddle pocket and preplace the fixation sutures.
Inclusion branch
A medial hypoglossal branch to the genioglossus. It protrudes the tongue and is the stimulation target.
Exclusion branch
A lateral hypoglossal branch to the hyoglossus. It retracts the tongue and is not a stimulation target.
Genioglossus (GG)
The main tongue protrusor. It is paler than the geniohyoid and travels deep to the hyoid.
Geniohyoid (GH)
The vertically oriented muscle beneath the mylohyoid. It inserts on the hyoid and is split at its midline raphe.
Hyoglossus (HG)
A tongue retractor. Its edge marks how far distally the nerve dissection must go.
Level IA
The submental compartment between the anterior bellies of the digastric, cleared of fat to expose the mylohyoid.
Ranine vein
The vein that travels with the hypoglossal nerve. Its branches often cross the nerve and are divided to see the branching pattern.
NIM
Nerve Integrity Monitor. In this setup, four channels record the genioglossus and the styloglossus/hyoglossus on each side.
Amplitude
Stimulation strength, as a percentage of maximum output. Testing looks for the intended response at low amplitude; more than 20% calls for repositioning.
Pulse width
The duration of each stimulation pulse, set in microseconds (µs); the FDA labeling calls it pulse duration or pulse length (50 to 250 µs). At the same amplitude, a longer pulse width delivers more charge.
C1
Fibers from the first cervical nerve that travel with the hypoglossal nerve. They are often not included in this approach.
Neuro patty
A small cotton pad used to protect tissue, such as the prepared first side.
Kittner
A small, firm gauze dissector held in a clamp for blunt dissection.
Educational material for residents and clinicians. Includes real operative photographs. Learning progress is kept only on this device if you choose to remember it. Site privacy notice.
Disclosures
Ryan Nord, MD, is a clinical investigator for Nyxoah, the maker of Genio, and a member of the clinical events committee for Nyxoah-sponsored trials. He has also served as a consultant for Inspire Medical Systems. This is his personal educational website. The education center adapts his teaching materials for resident education; it is not a manufacturer training credential. See the full disclosures for his industry relationships and how to report a content correction.